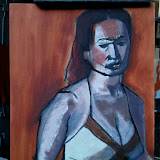
Sunday, December 12, 2010

New Painting Done, But portrait still in the works...


Well this is what I was doing in class over the last couple of weeks, but haven't had time to update because I've been busy with the self-portrait. I missed class a few times (as indicated by the number of days I worked on this). This is the first painting in MCKs class that I've actually done on a canvas since the summertime, I think I'm getting more confident to move past just panels -- they seem a pain to frame.

Below is the progression of this painting. I didn't get the model's name, hence the title...Well, I'm about to start up again on the self-portrait. I went to sleep at 6am last night, but there's a new pose tmrw so I can sleep in -ish. Kk, peace!

mck fall#7

Saturday, December 4, 2010

Self-Portrait


Had to post this even though I'm tired. Spent the day updating and organizing. Then I was sure that I had to start on the self-portrait assignment due the 16th. So my plan was to at least get the set-up going.

Mary Beth isn't letting us use a photo at all. I think that's cool, because (a) the class is called "painting FROM LIFE" and (b) it's infinitely harder!

So I set up the mirror, commandeered a lamp, shut off all the lights, put on my fav jacket and stood around until I got myself into a good pose. Once I had secured the light source and taped off my foot marker, I was going to stop.

Suddenly I was restless. I wasn't in the mood for watching a movie (strange) and even though my foot is injured I just dove right in to standing still and sketching myself.

I kept looking at the mirror and then to the paper and back to me. I had to remember to tilt my head at the angle of the pose each time I looked. I honestly thought it was going to take me 2 days to just get a decent study of myself.

I put on a playlist that has helped me out finishing "BrnxGrrlOMG" but it became evident that these songs are more and more what I feel like, especially when I paint. Here's the list, which is always randomzied:


So with a dark room, except for my figure in the mirror, I started to sketch. Checking angles and lines, getting a sense of the darkest darks and the lightest lights. It was difficult to hold the pad in my hand and the charcoal and still find the pose. I took breaks when needed but VERY surprised that it started to look like me.

I honestly thought I would take 3 days to do the drawing, and it would look horribly wrong. What you see is 40 min. worth of effort. I'm blown away and just so fucking happy about this turn out. I'm sharing this feeling because it's new to me and I'm just like, fuckin, ahhhh -- it feels great.

If I had canvas handy I wouldve started the painting straight away, but alas, no. So tomorrow I have Porcu all day and I'm sure as shit gonna purchase canvas before I leave. I've already decided the dimensions -- 24 x 18 in. It's the largest canvas I'll use since my paintings have started to improve. So tired, so long :)

Friday, December 3, 2010

Exhibiting and For Sale!


Ok, major updates! 3 of my painting will be hanging up in spots in the city this month! The first is a painting that I started last spring and has been TORTUROUS in finishing. I started it with Cenedella, so my method differed SO MUCH from what I do now with McKenzie. In finishing it I thought about how I would start this over using the McKenzie method, but hey I think it looks GREAT! I've gotten really great reactions to it so far! Importantly, the subject of the painting loved it. Stay tuned for a documentary that will feature me and her and talking about why this was painted and who she is and why I did it etc. I'll post that for sure when it's done.

It's on display starting Monday, Dec. 6, at the "Holiday Show and Sale" until Dec. 23 and I wonder if someone will actually purchase it.


The second is part a group show Small Works Exhibition at the Manhattan Borough President's Office. It's the little painting I started that was the first in a (perhaps) series of urban landscapes.

So these are the paintings that I've been coming home to every night until 1-2 am and working on, which explains my inability to update this blog.

Oh, almost forgot, the final painting on display is "Cecily" in the cafeteria.

I also like that I'm getting more comfortable with signing these as finished works; I think it's cool. And, if you want to see the progression of the first two painting, stop by and visit the albums below! Enjoy and, um, er...buy the paintings? They make wonderful stocking stuffers :P

And now to start a self-portrait due in class on the 16th...!

Urban Landscape1


BrnxGrrlOMG

Sunday, November 14, 2010

Porcu -- Adding Major Masses to the Armature

Anatomy for Artists, Écorché with Frank Porcu


Ok, so there's a bunch of pictures in the album above that show a significant step forward in constructing our écorchés. Over the weeks I've been still going to class every Sunday, from 10am-5pm and we've been lectured on the anatomy of the 3 major masses -- pelvis, ribcage, skull. We sculpted and truncated them from clay.

This time we finally placed them onto the armature, and the captions of the pix describe the progression. Enjoy!

Friday, November 12, 2010

Tunisian Collaborative Painting Workshop

"Move If You Wanna"


Ok, I just came from a most energizing, energetic, and exhausting (painting) experience I've had in a while!

You are looking at the results of my taking part in the Tunisian Collaborative Painting Workshop at the League. You can read all the wonderful details and origins of this painting method on the official website using the link above.

David Black was GREAT in explaining everything to us. He was totally cool and came off a little bit to me like a cool priest :) Anyway, there were 6 artists (including me) working as a group (yay Group2!) on one canvas AT THE SAME TIME.

Interestingly enough, everything worked out pretty smoothly. Our first collaboration is above ("Move If You Wanna"). I have to admit that about "halfway" thru the painting I was worried that it looked like two distinct paintings on one canvas. I did, however, have a strategy going into the first one. I basically stepped back from it, saw the colors/shapes that were being laid down, and brought the forms out using black. So that's what I kept doing. Filling in the spots with big color shapes (yellow, pink) and then finding form with black. I also tried to unify the painting with elements that transverse the canvas. We voted as a group when we thought the painting was done. I just kept stepping back and going in, finding form, adding big sections of color -- it reminded me of the Basquiat/Warhol collaborative paintings. It came out pretty cool I think!

During the discussion break I noticed that there were pieces of the painting that I wanted to "fix" but couldn't and I would just have to accept it. Also, one of my group members turned out very frustrated and non-freeing which was the opposite feeling of the majority. But it did feel freeing to me. I could just step back and react to shapes and colors that were being put up in the moment. It was so cool!

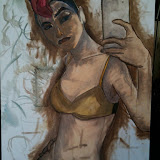
Ok, for the next painting I knew that I wasn't going to be using black because that had been done in the first, so I didn't really have a plan or goal. I stepped back a lot more and just looked at what my group members were doing. I actually started out by writing non-related letters, like "XVZ" and smilies "=[" but they eventually got painted out, which didnt bother me at all. I wanted to unify the painting so I put in the series of circles that again transverse the painting. I started to notice some of the elements that other group members were painting and tried to replicate them myself. An example of this is the triangles evident in the middleish of "Move If You Wanna" and on the right column of "Stepping Stones" below. The group member that was initially inhibited in the first painting (she felt better in the second one) put these on. So when I saw her put them on again in the second painting I replicated them into the column that you see. I think they were really great in the second and gave us a great structure to help us look at the entire work.

Stepping back and looking at these paintings, it does seem like only one artist painted them which is interesting. Also, I really like that our paintings look different from each other. "Move If You Wanna" is more structural while "Stepping Stones" is more organic. I'm not laying any judgment there, just making an observation.

We painting for 4 hours and came up with these paintings. It was great. I wish I could do this every couple of weeks! AND this has actually gotten me to revisit my abstract work. Abstracts have always mad more sense to me intuitively. I was looking at my unfinished abstracts and I think I want to approach them in this more freeing method. I kept thinking "no hesitation" like Picasso in "The Mystery of Picasso".

So great!

"Stepping Stones"

MCK Workshop Finale

(Wednesday)


This week is a bust! I feel like everything that I was supposed to get out of the studies last week didnt take! Im a goon! (FYI monday the model was absent and my painting sucked SO BAD on tuesday that I didnt even take a pic) So by the end of wed. my disgusting "painting" was so out out of proportion that I had to erase the head, as you can see. I must have redrawn it like 3 times and EACH time i redrew it in the same INCORRECT way. (ugh!)

(Thursday)


When MCK came over she basically said that I needed to put in the colors (accurately) of the elements in the background. Once those were in the colors of the model would make more sense. I did, and she was right.

"Spot on," she said and then let out a little laugh.


(Today)


I didn't hate this painting anymore, just wanted to work it. I got the other background and foreground colors in more accurately. It was instantly easier to see the skin tones and work them. I added the hint of a little line here and there and I think it serves to create a unified little world of this painting. I wish I was in this groove earlier in the week, but lesson learned. So here's what I got out of this 2 week workshop:
  • Accurate color is everything.
  • Worry about getting the shapes correct with their colors.
  • Background/foreground elements have as much impact on the subject as the light on the subject itself.
  • Details will be revealed (are easier) thru the course of getting the major colors/shapes accurate (so don't worry so much about them)

What an amazing lesson to be learned, thanks so much MCK.

Wednesday, November 10, 2010

Urban Landscape1


Ok I got back from the 2010 Grant Winners Exhibition and was again inspired by my role model, Beñat Iglesias. Among other amazing work he has this wall of small landscape paintings that are phenomenal. I started my own versions but don't really know what landscapes look like being a city kid all my life so here it is.

The scene is Queens Blvd/Continental Ave. on a normal day (as I see it). The top pic was the beginning of the painting (yesterday) which is kinda weird. Because it's the smallest I've ever worked (8 x 10 in.) I can cover a lot more canvas with minimal brushstroke. On the downside the smallest bit that Im off makes a huge difference.

Below is tonight's version which already is starting to come to life. I find that the paint is taking FOREVER to dry, so I have to make bolder brushstrokes loaded with paint to make an impression on the canvas. Maybe in a few more nights this will be done. But this has made me want to put out a series of Urban Landscapes -- more to follow!

Monday, November 8, 2010

Working from Reference =\

(Saturday, the 6th)


Well this was my first attempt at finishing this piece from reference photos back home in NYC. I was nervous because my instinct was telling me that I had so much left to do on this one, and the photos were not EXACTLY the right angles, etc. So I first had to go thru about 70 reference photos that I took with my trusty iPhone and I narrowed it down to 22, and of these there's basically one that I keep looking at.

Well I'm relieved to say that I overestimated how much work was left on this portrait! The good news about the reference pix is that I can get the nose and eyes much more accurately than ever before. There are some real subtle and tricky angles in her nose, but they make all the difference in the world with regards to getting the likeness more accurate.

What sux about the pix is, simply put, the color.

But hey check out the hair, which i feel has great texture now, and her eyes have gotten much better. Shouldnt take more than 3 solid sessions to finish this =)

(tonight's progress)

Friday, November 5, 2010

Day 5 -- Non Dominant Hand


Ok, you ready? This was all done with my left hand! I know, right?!

Well of course it's not that good but still I thought it was a cool way to wind down the 5 days of color studies. It was with this that I started to put together the point of these exercises.

What I learned most was to focus on getting accurate colors and then the details will reveal themselves.

I spend so much time worrying about details and likeness but by throwing everything up in the air (esp. with the left hand exercise) I was forced to completely forget details and just focus on the colors and shapes. So, hopefully I can take this into account next week when we revisit the model and her first pose :)

Thursday, November 4, 2010

Day 4 -- Palette Knife


We were not allowed to paint with brushes at all today. The painting had to be completed with a palette knife only. I set out to get the figure right, pretty much like the geometric color study. But then I could hear MCK telling people that they had to put more color in their studies (the monitors have set up a series of colorful backdrops for each model).

So since I hadnt done much yet, I restarted by painting in the red stool. When MCK came over she explained the she wanted at least 5 major colors in the study. If I got the surrounding colors right, the model would become easier to get. Until then I had totally thought to focus on the model, but she said the point of the exercise was to see how the surrounding colors create the shape that we perceive as the model. So cool!

So here it is, 5 colors like MCK ordered. I wouldve liked to get a bit more nuance in each of the major shapes, but what the hell.

By the way, cleaning up without using brushes was fuckin great!

Wednesday, November 3, 2010

Day 3 -- Painting From Memory


Ok so there are always 2 models in the studio and we pick our spots and model on which to focus. So in today's assignment we were told to look at the other model in the studio, stay in our spots, and paint from memory.

How to approach this? Well I think last time I cheated a bit, so this time I didnt give a fuck about making the image look realistic at all. I was just interested in making the thing resemble that which I could remember of the model. It's funny that the picture ends up looking like a cartoon, but I like the shapes, colors, and composition. I think it's pretty cool for a study of the model from memory. (I tried to stare at her as long as possible without looking back and forth, which I thought was cheating-ish. I only did that for the details in the face etc.)

Tuesday, November 2, 2010

Day 2 -- Geometric Shapes


This was my favorite assignment from last summer, because it was about abstract shapes. This time I don't think I did as good as last time:


The difference is that I drew an angular outline and then tried to fill that outline in with colored geometric shapes. I should have just started painting the shapes taken it from there. All in all it was an ok attempt I think. I didn't get a good enough sense of her colors though, which I think was the point of the assignment :(

Monday, November 1, 2010

Fall Workshop -- Day 1 Blind Contour Drawing


Ok before you say anything give me a second to explain. MCK is doing something this week to which I have been looking forward since the summer. Everyday this week we are doing a different painting exercise. Then she will only give us one week to start and finish the painting. The idea is to do a series of different studies to familiarize ourselves completely with the model and the pose so that when we start the painting we should have a really good idea of what to do!


So here on this first day the assignment is to draw the model, without looking at the paper! Oh man, when I did this over the summer I was sooo frustrated but this time I just had fun! I remembered Rob's disposition -- he was so cool and was actually laughing at his drawings so that's what I ended up doing. Trust me there are like 6 pages of these weird drawings but here are a few quickies. The first is what the actual pose will be for next week. The other is me trying to focus on the face. They look like strange cubist/linear nightmares but trust me I DID NOT look at the paper once (as you can see) =P Looking forward to tomorrow!

Saturday, October 30, 2010

Day 4 -- Unfinished


Ok at this stage the likeness is the most accurate it has been, but I am frustrated because it wont be done in the time we have to work on this painting :(

So I ended up having to take a bunch of pix with my iPhone as reference so that I can finish it back in NYC. I am totally tenuous about this endeavor but have to make do...Actually looking at the painting now, I don't hate myself as much as I did.

Post Script:
Airport security was most kind when handling the painting -- "I'll make sure it doesn't get scratched" they conveyor belt guy said. How nice, right? Also, the people on the other end said "wow you did that?" to which I responded that it totally wasnt done yet before the other person said "I would buy that."

This was all a great boost and set me at ease for the flight that had me most nervous =)

Friday, October 29, 2010

Day 2 & 3 -- Progress-ish

(Day 2)


Ok so I'm getting the major shapes in place and the darks and lights are starting to make more sense. Again, this was done with the squinting technique. The likeness isnt there yet and I wish MCK would magically appear over my shoulder and let me know how to push it forward...

(End of Day 3)


Here the colors are working much better as they are more accurate. Also Im happy to report that I went back to drawing and found out that I had put in the neck lines to long, and by shortening them, the face makes more sense. By going back to drawng, I noticed a few lines in the subject that helped to define the form. Unfortunately, the overall expression looks like she's in disdain, which is TOTALLY off the mark, but should be fixed in the next session :) I also think the texture of the hair is starting to make more sense.

Tuesday, October 26, 2010

Painting From Life -- For Real!

(Study in graphite and charcoal thumbnail sketch)


This assignment was sort of scary to me, for I am, for the first time, actually painting from life. This is the first time I've painting in non-studio conditions, aside from my one attempt at painting my father that didnt go well.

MCK always says this is the only way to paint. I've seen that much of her work is done by painting her subjects at their houses etc, and so here I am with my first real attempt. The conditions, all in all, are good. It was my first time trying to use a disposable paper palette and it SUCKED. I bought them for my mother and would advise against it. I see people using them in class and after about 20 min, I don't understand how they can actually mix colors on them.

I ended up using an old desk drawer as a make-shift palette :)

I think it's going well so far. The studies and the subsequent painting were done in one session. A note on light I figured out...When painting from daylight it was great - felt like the studio, but it seems that evening hours work best for the subject. So, we set up a lamp in the same position as the sunlight but it's so interesting how it completely changed the colors that I perceive.

In the daylight the background was a cool white, while in the evening with the artificial light it was a warm beige. Also, the cool highlights have been replaced with warmer colors. I don't know how I'm going to handle all this, out here in the field, ad hoc painting as it is.

Either way this is all exciting and I'm happy to report that the skills that I've learned in class are translating to this first real experience. More updates to follow...!

Friday, October 22, 2010

Day 4/Finished!


When MCK critiqued this time she focused on the drawing more than anything. Her biggest problem was his forehead, saying that it should be larger, and when she made the correction, other pieces soon became more obvious that had to change (such as the neck and hair line).

I was willing to make the forehead and neck change, but I felt like there was no time to change the top of the head and still have time enough to add the details.

On this last day I was reticent to add the facial hair as details, but I knew it would really sell the likeness. In the meantime, this painting has brought more classmates over to me than the previous paintings. They say I'm developing a style, but to me I'm just trying to do what MCK says and listen and read and make a good painting.

But, with the push from Jackie, I tackled the facial hair and was AMAZED at what it did to the painting. It really came to life and Jackie stopped mid-pose to tell me so! It felt GREAT.

I studied this painting on my train ride to school, and knew that I had to fix the background, add facial and necklace details, and color the new forehead/neck, and of course add the highlights. I worked at it and executed the plan -- even working straight thru the long break -- and here you have it.

I feel this is the best work Ive done so far and wish you could see it in person or at least that I could take a better picture of it. Either way, enjoy!

Wednesday, October 20, 2010

Day 2-3


In these days I just kept diligently working on getting the shapes and colors right -- still conscience of the 5 day deadline on this painting. By the end of the 3rd day I was beginning to get muddy again but I brought the painting back in 1 pose! So much for the days of pining and freaking out!

Monday, October 18, 2010

MCK Fall Model #4 - Day 1 - A Quick Study


I've only got 5 days for this model, so I have to work much faster than I'm used to. Good news is Ive got a GREAT easel this time, but I wont have the full 10 days on it. So, instead of taking a whole day for the drawing, I did 2 quick sketches with pencil and charcoal, and then raced to get this down on the panel.

The likeness is way off and I believe that I'll get closer tmrw when I start putting in the lights and, more importantly, redrawing.

Friday, October 15, 2010

Day 8 -- Finishing Up


Done and done! This was the first time that I finished a painting and wasnt rushing at the last minute during the last pose. I set in the final details, cleaned up some small parts on the darks and lights. Well I stepped back and figured "Im done." It was a great feeling and only around 10:15 :) So I was going to pack up and leave but then I figured I could use all the extra time to finish up the last painting...


So here's the finished version of the previous painting. I cleaned up the entire background and it look much better. Oh man so tired...

Friday, October 8, 2010

Day 3 -- Glasses


So this is my palette, clean and ready for another day's work. I took this picture because it's my new layout. I've been sneaking looks at other peoples' palettes, reading notes, and asking MCK but no one had a specific layout to share. So I took it open myself to lay it out like this (from bottom left going clockwise up):
Ivory Black, French Ultramarine, Cobalt Blue, Cerulean Blue, Veridian, Cadmium Orange, Cadmium Yellow, Van Dyke Brown, Burnt Sienna, Alizarin Permanent, Light Red, Cadmium Red, Flake White #1

If anyone has any suggestions on another way to set up my palette I would love to hear it, but I'll see how this works for now. I've abandoned the palette from my previous class to see how these work out, but I like having them all laid out at once, so if I need a color it's right there, no searching for it as MCK says.


As you can see the glasses are here! I was going to avoid these spectacles until the last stage, but the painting demanded they come earlier. I couldn't quite get the nose/mouth area to work. So I finally had to put in the bridge of the glasses and then the rest for me to get accurate measurements. As soon as they starting coming in the nose was A LOT easier to get more correct. But with the glasses I saw how far off the eyes were. I guess I'm saying that putting them in solved a lot of my early problems here and made me stress less about this troublesome area. It helped! Also, the likeness is now more on point because of them.

Next week is going to be weird because MCK is out of town, which means I'm going to have to finish this one on my own, but I guess that means I'm going to have to compensate by getting Renee to help me look at it.

Overall feeling ok about this one, but am a bit confused as to where to start on Monday -- perhaps the nose...

Thursday, October 7, 2010

Day 1-2 Colors & Shapes

(Day 1)
Well I guess it's a portrait from the shoulders up! On the first day I just tried to get the drawing right, making sure that the contours of the face and hair matched as best I could. Added the darks right away and spent some time trying to get the color right, but I think I missed on that front. After that the background color had to come in right away as per MCKs training. She's standing in front of a curtain that's black and a wall that's grey hence the 2-colored background. From my angle, light is hitting the curtain making the black seem more like a violet. She's also wearing glasses which worries me because it just leaves that much more room for me to fuck this all up.

(Day 2)
On Day 2 my task was clear: get the colors right! I remixed the darkest dark but in writing this can't remember how I got there. The lightest light came in, and for that I used white with cerulean blue and some cad red and cad yellow. It was the blue that I was happy to see with me eye.

You can also see me redrawing with my black lines, making sure that I'm getting in all the major shapes that define her. By the time MCK came around she said to simplify the dark pattern (I had another reflective light on her neck area but the squinting trick made them disappear so she painted it out). I told her I was worried that I was way off on the color and she didn't think so. She added a bit of yellow ochre to whatever color I had mixed to get the shadow.

Also, from this angle, the area from the nose to mouth and left eye is tricky and she said "yes it is." So I'm worried about that too, but last time I got to committed to thinking I was right or that I might fuck it up and I did anyway. So if I have to repaint an entire area fuck it -- I'll do it. I asked her outright, was the ear wrong. She gave a look and said "it doesn't bother me -- it didn't jump out at me -- I didn't have a problem with it when I looked at the painting" so that made me feel like I learned from my past mistake. (I made sure to put it at an angle, which I didn't do last time.)

All in all not a bad couple of days. There's something about this painting, even at this stage, that looks like it has more weight or something...right?

Monday, October 4, 2010

Day 0 - New Model


First day of a new pose. Settling in always sucks, but it's sort of freeing only worrying about what Im actually going to paint. Looking at the model I like the shoulders up, but I wonder if it's too similar to "Camille."

I also like the navel area, so perhaps a 2 day study on that...?

Sunday, October 3, 2010

Head Truncation

Illustration by Frank Porcu


We had homework during the week which was to construct a block of clay (from a larger one) with the dimensions of 1 head high, 3/4 head wide, and 7/8 head deep. We brought those in, and Porcu began a series of drawings (along with lecture) that outlined the truncations (cuts?) that would be performed to turn the block into the beginnings of our écorché skull.

The drawings/lecture lasted the ENTIRE time. We took diligent notes and you can see the beginning of them above. We actually ran out of time just setting up so there was no actual cutting that got done, which I think puts us behind schedule.

Something very cool happened however. In telling us about the truncations for the frontal and occipital parietal widths I actually saw the practical application of all this anatomical knowledge.

He explained the planes of the skull, noting that only one side of the skull, the "true side-plane" catches light "head on" and the other planes move away from the light. He demoed with an illustration and then wrapped a piece of paper around the model's skull.

We IMMEDIATELY saw the change in value of the paper. It's so obvious to me know, but this small demo made me realize how important this anatomy is. If I can know the exact underlying structure of the skull it will inform me as to the change in values in the shapes I see in the figure :)

He also showed us how the image of Washington on the $1 bill takes into account these anatomical laws and the image on the new $5 bill DOES NOT. Lincoln looks like a mutant and Frank showed us how and why.

My homework for next week will be to finally transfer my notes cleanly into my nice hard-bound notebooken. (That's make-believe dutch for cuaderno.)

Friday, October 1, 2010

Days 8-9 The Finale

(Day 8)


Ok so Im done. Finished better than I thought I would considered the debacle of the last three days. Yesterday MCK came by and laid some of my fears to rest-ish. She said that I wasn't that far off on the nose. She cut into the left side of the neck and it felt better, the head made more sense to me. She said that the ear looked better but still had to be at an angle.

After her critique I still felt like I had taken many steps backwards. I was frustrated and really worried that I would end up with shite after having done something nice. What really got me was that she said "maybe should you stop/start a new one." Ugh! That's the last thing I wanted to hear -- it just made me feel like this one was beyond saving. But it made me realize that I fell into an old trap -- that of thinking that I was going to leave with a finished painting. I should've not gotten attached to it, should've just kept telling myself that it's only practice.

Today, I was determined. Leaving it as bad as day 9 was unacceptable. My only goal was to get the nose/mouth to work. Was saved me was going back to drawing. I took my #1 bright brush and drew in the mouth/nose area and started attacking it almost from scratch.

I went back and got the colors in better on the shadow areas in the main part but also in the highlights of her face. I shortened the forehead that had grown as part of MCKs suggestion -- it just didnt feel right and I figured out why. The model had rotated so much that I was seeing a significantly different angle than the original. It's just not fair, man. (Im not blaming the model, but shouldnt things be easier for us?)

By the end, the edges of lines were working much better around the face, and the colors were working better with each other. All I really have to do now is make the background a more uniform color, and I believe that will make the figure really pop. At least I can stand to look at the finished product without having to set it on fire. It looks better in person - most art does - but I will post the finished painting sometime soon.

Now its time for sleep, I've homework to do for Porcu's class on Sunday.

(Day 9/Final)

Wednesday, September 29, 2010

Days 6-7 Discouraged

(Day 6)

(Day 7)


I WANT TO BURN MY PANEL! How did this all happen. How did this painting get away from me -- again! Ugh, it was all going so well, you saw it didn't you?!

It's been two days and my painting has been butchered. A villain has come in for the past two fuckin days and laid waste to my once ok painting.

The scoundrel was me!

Two days ago MCK told me to shorten the nose a bit and rework the ear completely. Look at the first piece of shit picture. Looks like the model got hacked in a nose job, and her lips have been turned into a duck.

How can I recover from that! Today I tried my best to get it back. I got to class on time and spent the ENTIRE time working solely in the nose and ear -- but wait I also found a way to fuck up the shadows on her cheek.

The more I worked the more it got away. You cannot imagine the manner in which emotions start to fuckin affect the painting when it's really getting a way from you. It's a total fucking snowball effect.

I couldn't even mix the right colors, I was like a plodding idiot -- "Duh, um, how do I mix red and blues, duh!" So towards the end I focused on the ear, redrawing it with black lines, and then painting accordingly, trying to trust me eyes again.

I think the ear looks better than any previous version in the painting. I tried to make the nose/mouth work better in a very general manner, so that I can attack it tomorrow. Only two more days to finish -- I want semblance of a completed painting.

I can only hope that MCK can help somehow in this colossal fuck up.

The best part of yesterday was, of all things, cleaning up! I've been introduced to THE BEST fuckin brush cleaner of all time, Jack's Linseed Studio Soap (the commercial sux but the product is kickass). It cleaned my brushed like I had always expected them to be cleaned by a soap product. I was doubtful when the guys at the store suggested it, but they were sooooo right.